
Embrace Veganuary Month with these Delicious Recipes
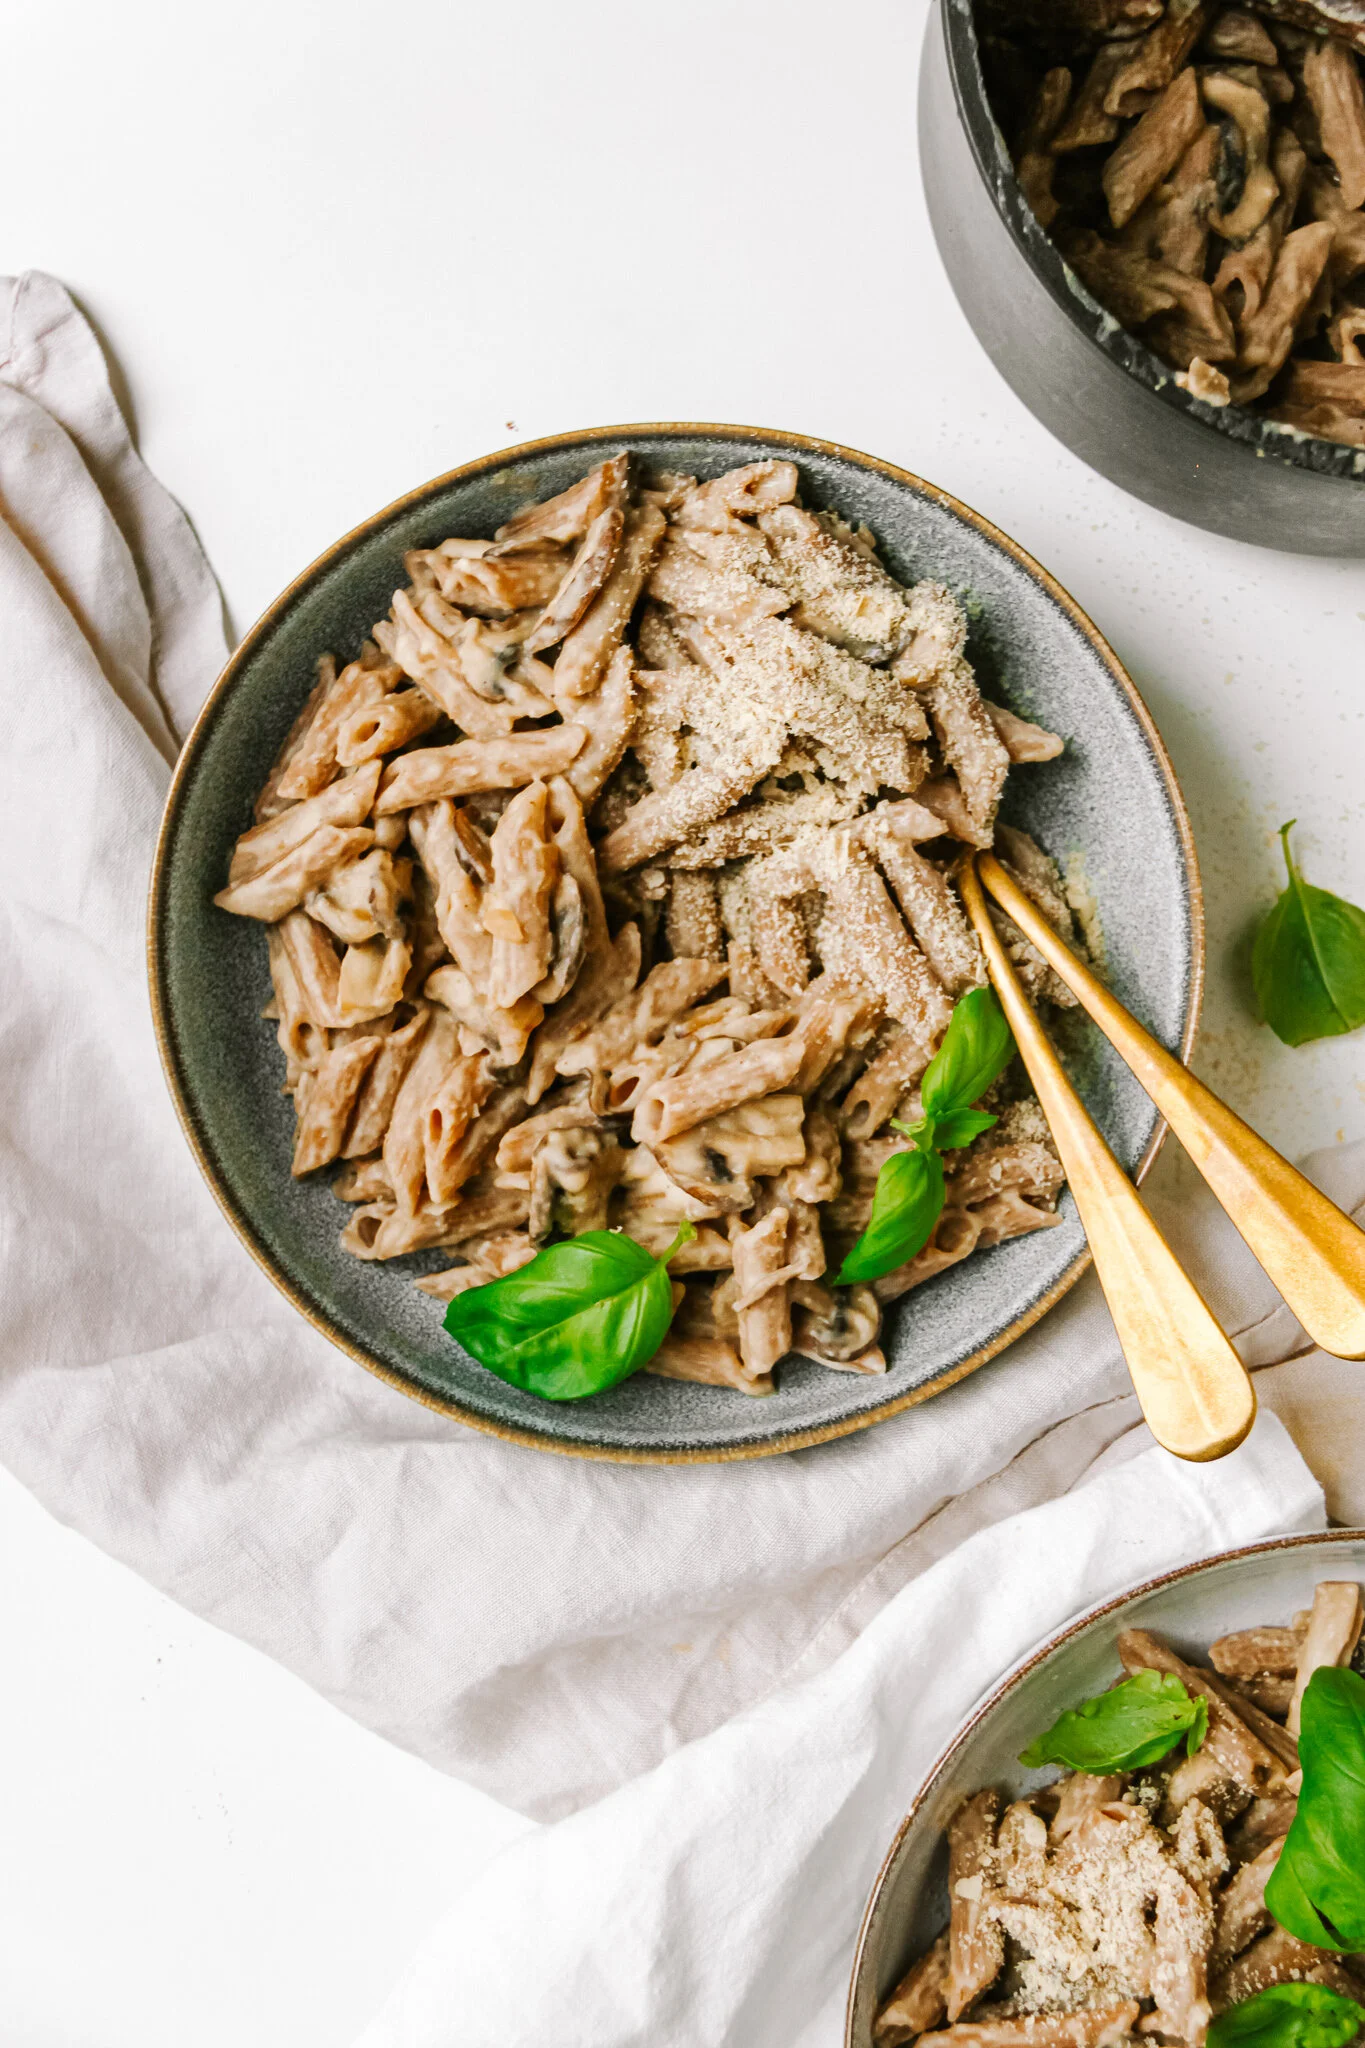
Super Easy and Creamy Vegan Mushroom Alfredo Pasta
A delicious, tangy, creamy bowl of pasta with a healthy mushroom sauce. Definitely not your regular pasta recipe but once you try it, you will want more and more of it!
unepetitecuisiniere.com
WHAT’S SPECIAL ABOUT THIS DISH?
Healthy, creamy pasta. Usually a creamy pasta sauce is either made with lots of cheese and butter or with cream or all together. Not very nutritious but loaded with saturated fats. But is it possible to make such a sauce in a healthy way? Yes it is!

unepetitecuisiniere.com
WHAT’S NUTRITIONAL YEAST
Nutritional yeast is a very popular cheese alternative for vegans or people who do not consume dairy. It is basically the same as yeast, it just is dehydrated and has a cheesy – like flavour.
What you will need
500g of Pasta
500g of Mushrooms
1 White Onion
1 tbsp Olive Oil
1 can of White Beans
20g of Cashews (soaked for a few hours if you do not have a high speed blender)
200ml of Plant-based milk
40g of Nutritional Yeast
1/2 tablespoon of Cornstarch
1/2 teaspoon Oregano
1 teaspoon of Mustard
Salt and Pepper
How to do it
Prepare the pasta according to package instructions.
Preheat the oil. Finely chop the onion and slice the mushrooms. Fry them in the oil. In a blender place all of the remaining ingredients and mix everything until smooth. Before the pasta is done cooking, preserve some pasta water.
When the pasta is ready, drain it and add to the mushrooms with the sauce. If the cream is too thick, add some of the pasta water.
Serve with more nutritional yeast and enjoy!
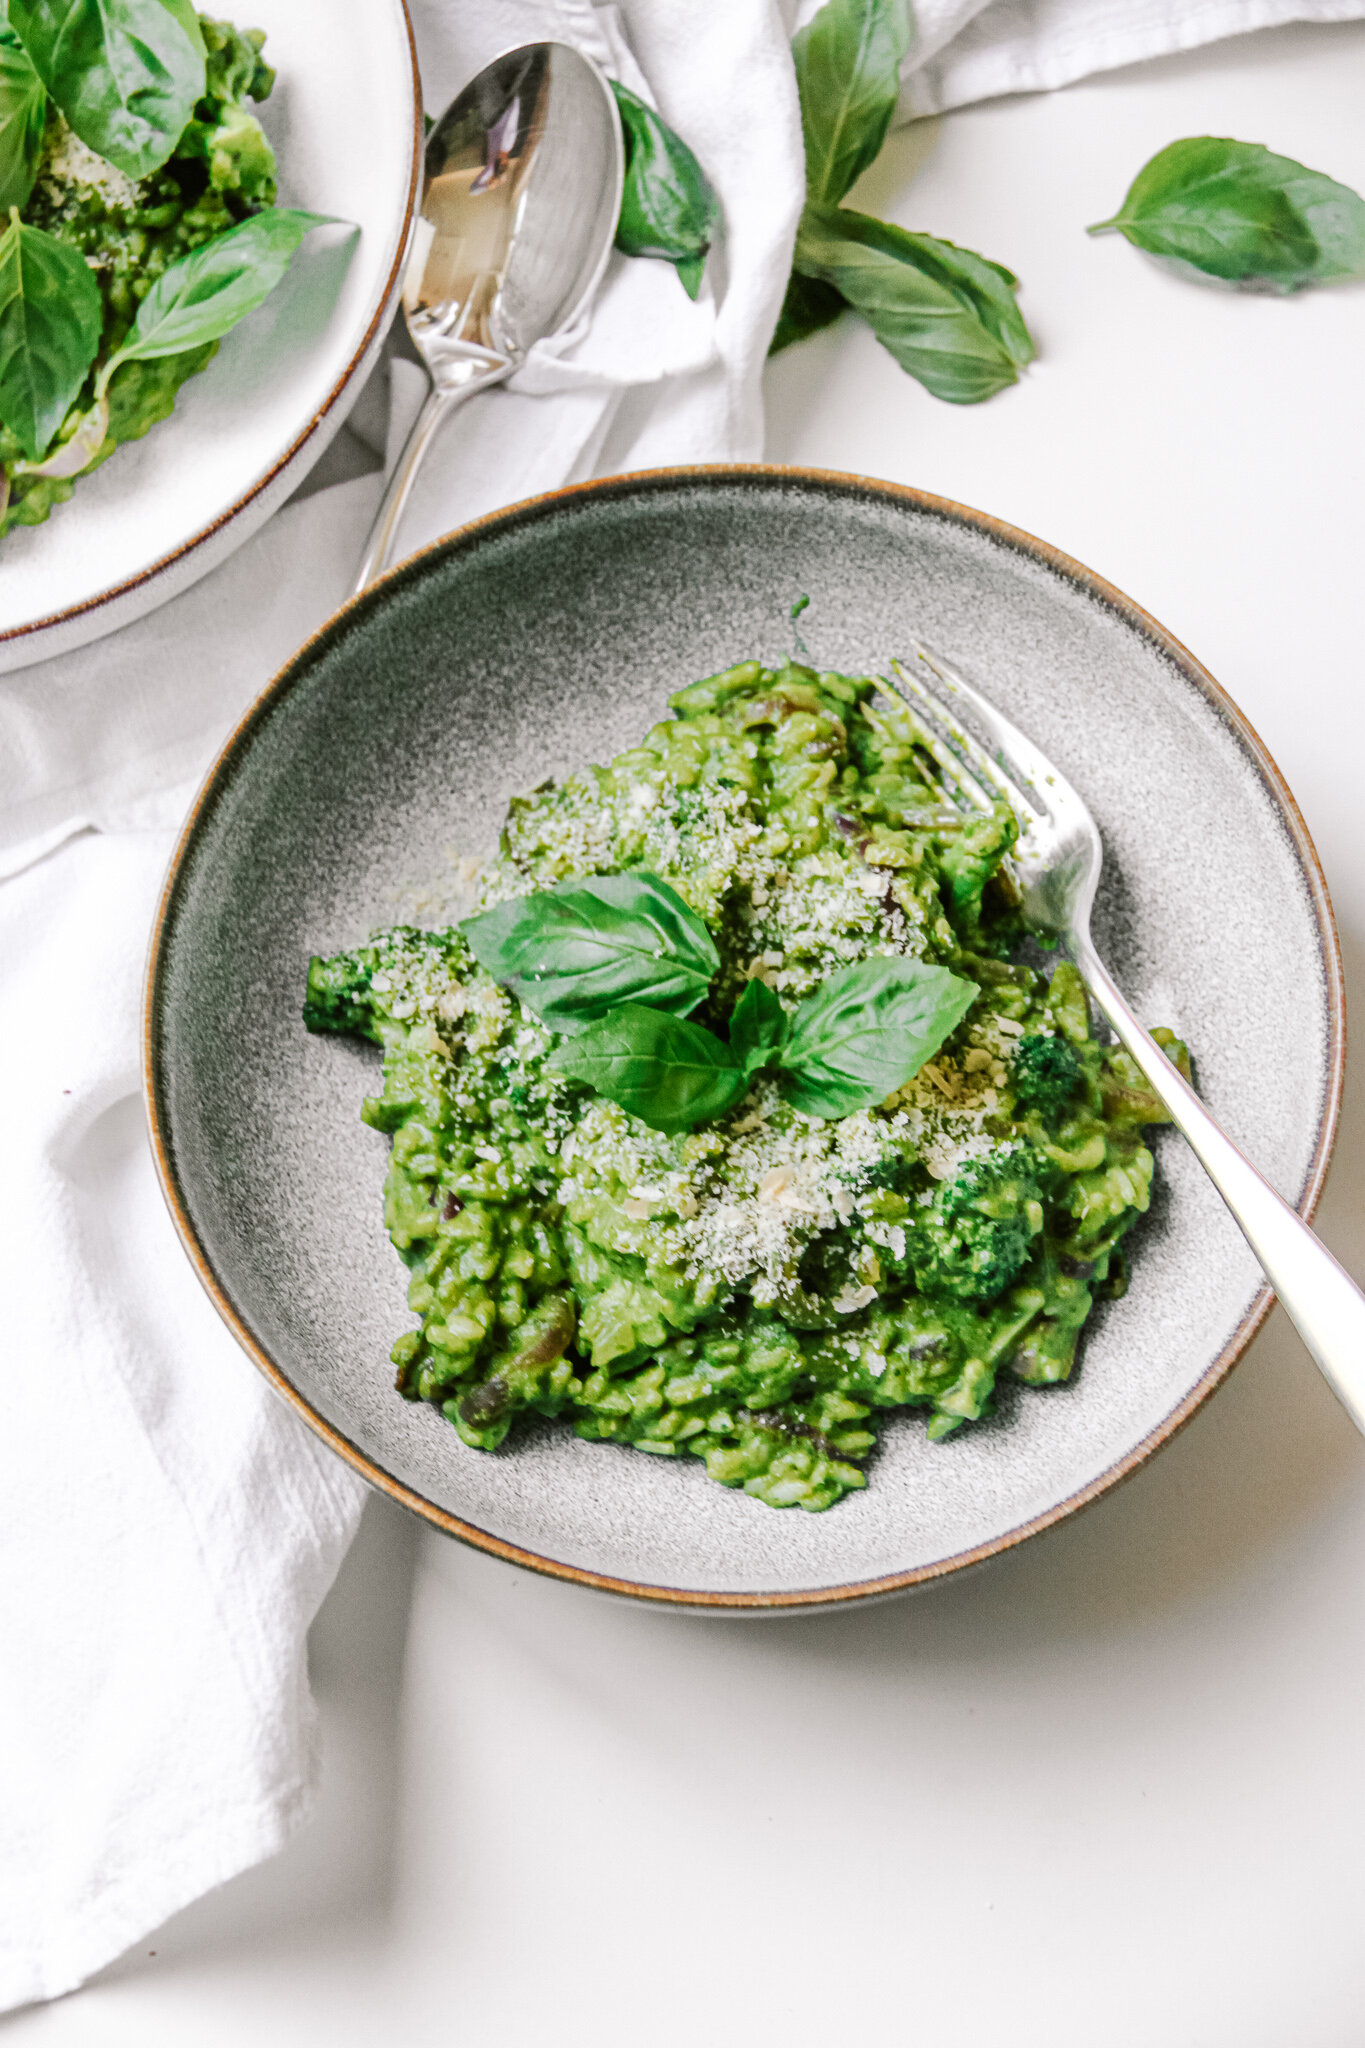
THE ULTIMATE CREAMY VEGAN GREEN RISOTTO
A healthy creamy deliciousness. At least as good as regular risotto just healthy and vegan!

unepetitecuisiniere.com
HOW TO MAKE VEGAN RISOTTO
The rise base is the same as for the regular risotto. So (vegetable) broth, onions, olive oil and arborio rice, also known as risotto rice. Instead of the cheese and the butter to create the creamy texture, we are using soaked cashews for the texture, nutritional yeast for the cheesy flavour, cornstarch to bind, plant-based milk, and mustard. Not to forget about the greens. We prefer mixing steamed spinach, kale and basil. The first two add a bunch of nutrients and the basil adds a lot of flavor. The combination is a dream.
IS IT HEALTHY?
Yes! It actually is. While regular risotto is not very healthy (but very delicious), this one actually is healthy too! Why? The greens add a lot of vitamins and fibre. But the aspect that really changes it, is the substitution of the cheese and butter with the creamy sauce. The cashews add some protein and unsaturated fats, which are better for us than unsaturated ones. Also the nutritional yeast adds a lot of nutrients! So yes, it is healthy!
What you will need
280g of Risotto Rice
2 litres of Vegetable Broth
1 tablespoon of Olive Oil
1 White Onion
For the creamy sauce
50g of Cashew Nuts (soaked for 4 hours if your blender is not high speed)
160ml of Plant-based milk
2 teaspoons of Mustard
4 tablespoons of Nutritional Yeast
1 tablespoon of Cornstarch
2 handful of Spinach
2 handful of Kale
1 handful of Basil
For the resT
2 small Red Onions
1 tablespoon of Olive Oil
1 tablespoon of Honey
How to DO IT
Heat up the vegetable broth. In a large pot heat up the olive oil. Finely dice the onion and add it to the oil once hot. Sautée for about 1 minute until shiny. Add the rice and cook for another minute. Turn the heat down to medium and add a cup of the vegetable broth. Let the rice soak up all of the vegetable broth added while stiring continuesly. When it has cooked away, repeat the process for about 12 minutes.
In the meantime steam or cook the spinach and kale for 4 minutes. Add them to a blender along with the cashews. plant-based milk, nutritional yeast, mustard, basil and cornstarch. Blend until creamy.
After about 12 minutes of the rice cooking add the green sauce. Mix through very well and cook for another 3-4 minutes until the rice is cooked through.
Seperate onto plates and serve with some extra nutritional yeast! Enjoy!
unepetitecuisiniere.com
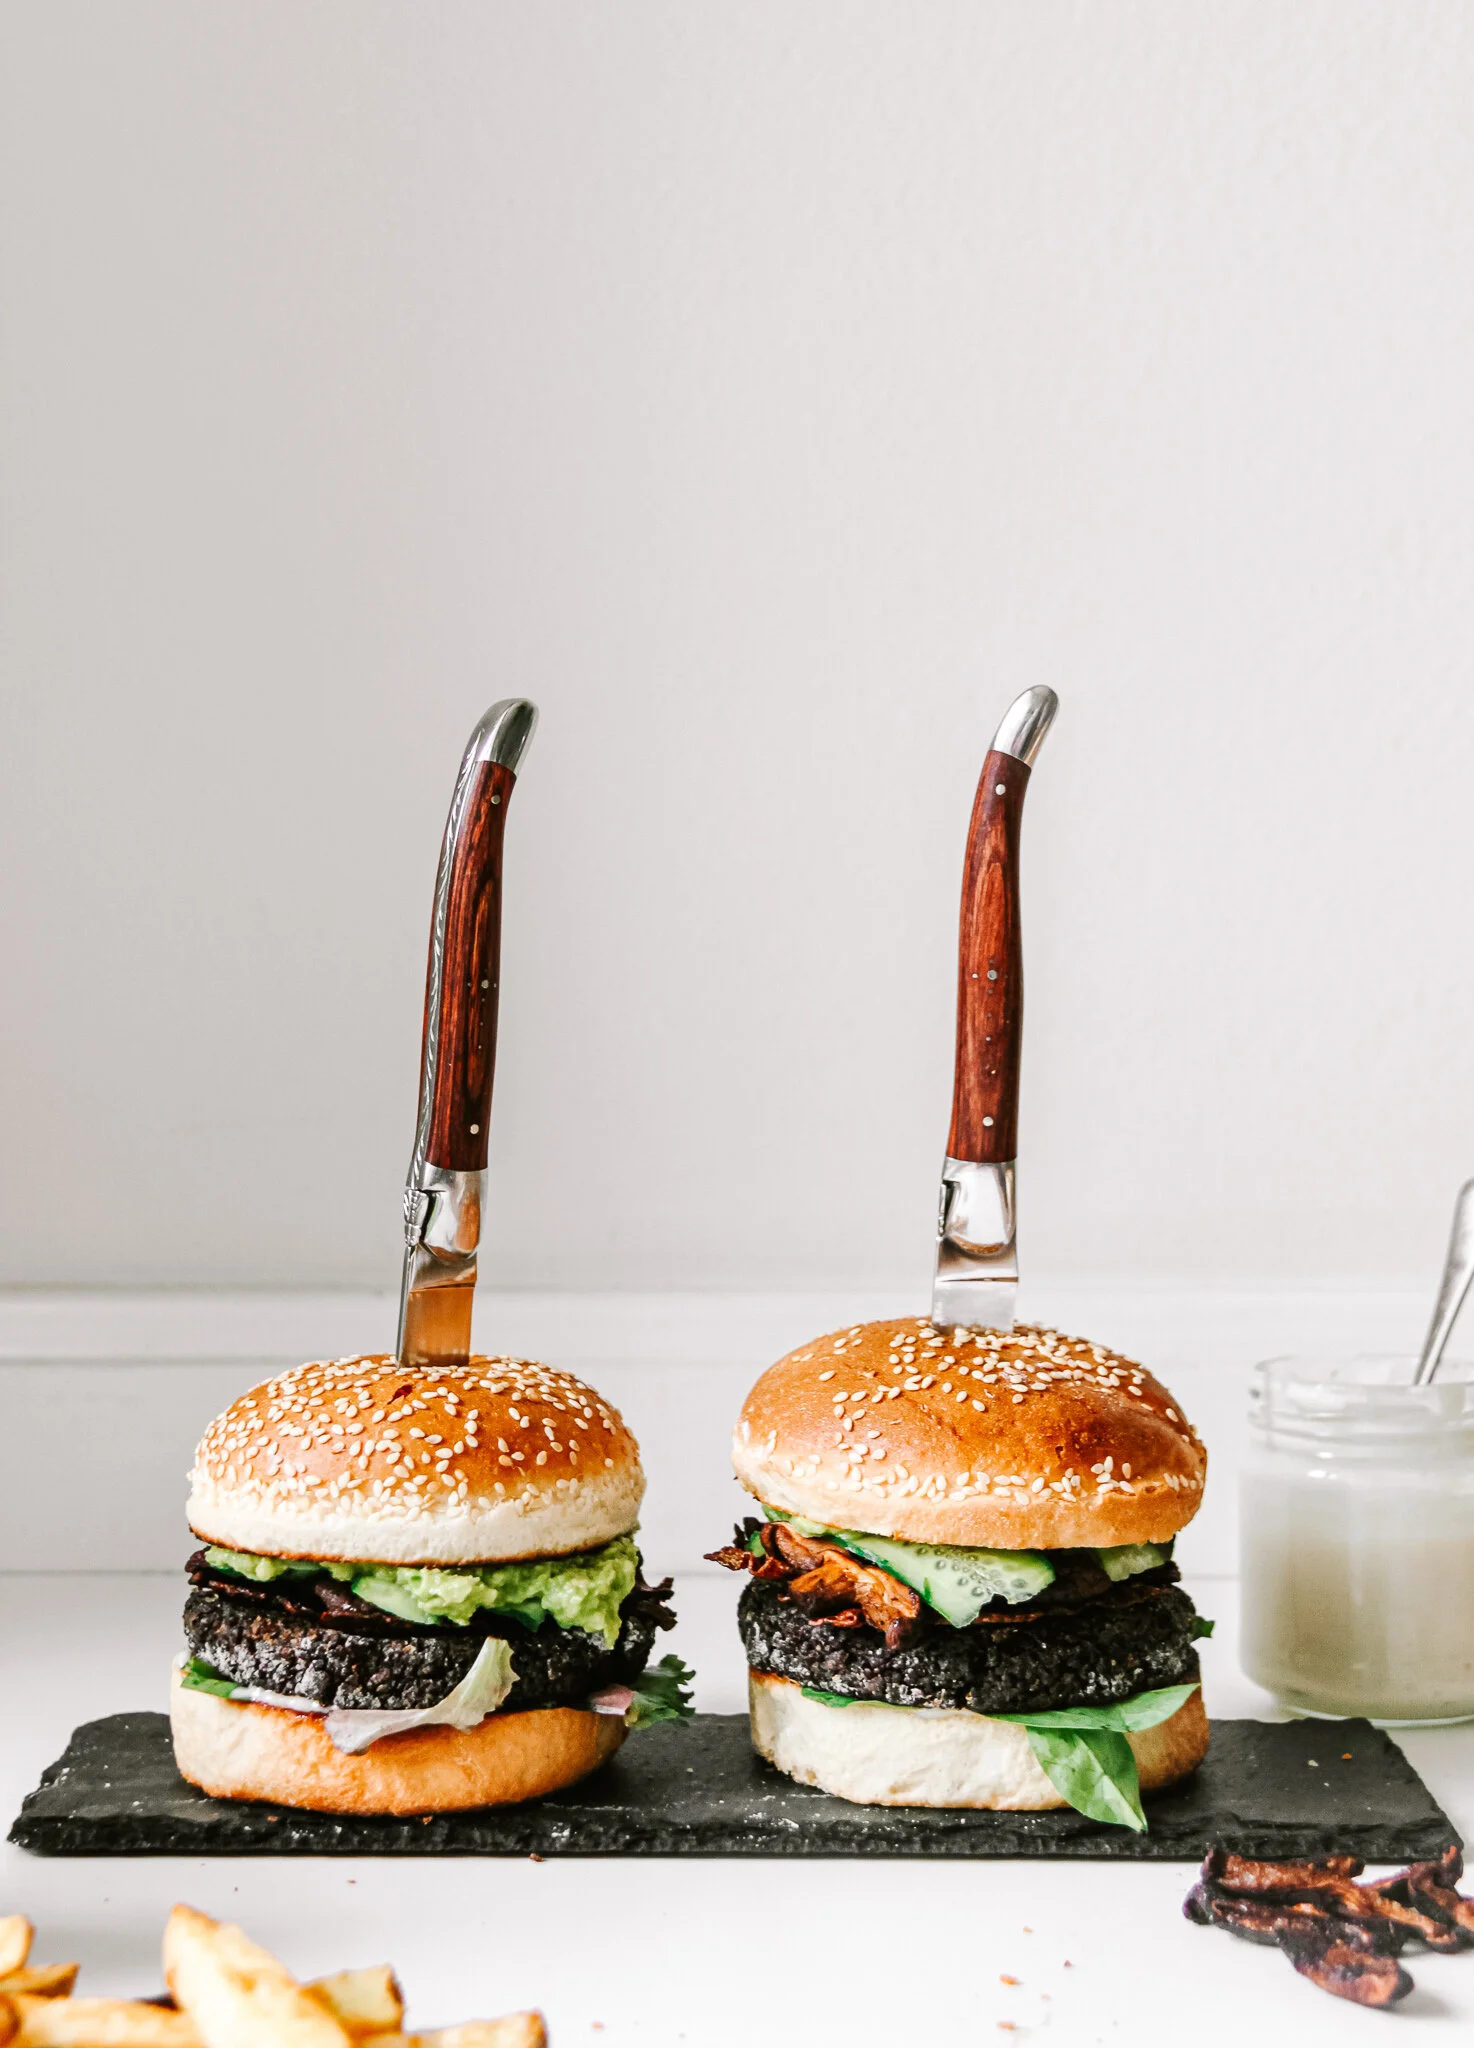
BLACK QUINOA TERIYAKI BURGER
Healthy Plant Based Burgers. A ton of flavor. A ton of goodness. Pretty easy, pretty good.

unepetitecuisiniere.com
Burgers; the ultimate comfort and fat food. The embodiment of unhealthy. But can you make it healthy? I can tell you, yes you can! This is a healthy, plant based and incredibly delicious version of the most popular fast food. A healthy black quinoa teriyaki burger.
WHY AREN’T BURGERS HEALTHY?
First things first. We always hear burgers are not healthy. But what exactly is it that is not healthy? A lot of people think it is the bun. Because bread has the reputation to be unhealthy. But we need to disappoint you if you were believing that because this is not true. Bread is a good source of carbohydrates and vitamins. Also it has some protein and little fat and sugar (although store bought burger buns may have a lot of sugar, so keep an eye out for that). Sure, if you choose a wholewheat burger bun it would be healthier. But this is not what we are referring to. The unhealthy parts of most burgers are the meat, cheese, bacon and sometimes even sauces.
The meat oftentimes is not healthy because usually fatty meat is used. This adds more flavour but also more calories and more fat. Bacon goes along the same way. Bacon mainly is made of fat and sodium. Which both is not healthy for us. And of course the cheese. Sure, cheese does have protein but again, the fat is the less healthy macronutrient here.
HOW TO BUILD THE PERFECT BURGER
Toast your bun. This crispness it up and adds a lot of flavour. No matter whether you are doing this in a toaster of a pan, this step is essential.
Sauce. Right on top of the bun that is the first layer, we are adding a sauce. Homemade ketchup or homemade mayonnaise and of course avocado or guacamole!
Greens. They won’t change much of the taste but much of the vitamins you get in. Also it is important to add a layer of greens before adding something else because when you add the patty or something else like tomatoes or cucumber right onto the bun it will get soggy.
The patty. Pretty self-explanatory.
Mushrooms/Zucchini/ Aubergines have a good flat surface to lay on.
Soggy veggies. Now you can add tomatoes, cucumber, or anything else containing a lot of water. It is not next to a bun so it won’t turn anything soggy.
Avocado/ Sauces. To finish it up, a nice layer of sauce or smashed avocado to add extra flavour and consistency.
The top bun. Again, we recommend to toast it.
THE QUINOA PATTY
Making a burger out of quinoa may sound a little weird but it is so good and so easy. The black quinoa adds an extra bit of flavour and depth to it. It is important to completely cook the quinoa through until it has absorbed all of the liquid. This way it will give a perfectly mushy consistency when blending. What also is important is the seasoning. Since it does not have as a strong flavour itself as meat does, we need to season it well. Here we are doing it with a super simple teriyaki sauce.
What you will need
100g of Quinoa
5 tablespoons of Soy Sauce
1/2 tablespoon of Cornstarch
1 teaspoon of Sriracha or Hot Sauce
1 tablespoon of Maple Syrup
2 tablespoons of Olive Oil
200g of Mushrooms
1 Avocado
2 Burger Buns
A handful of Greens
For the vegan mayonaise (makes about 8 servings)
125ml of Soy milk
1 tablespoon of Vinegar
200ml of Olive Oil
1 teaspoon of Mustard
1 teaspoon of Salt
unepetitecuisiniere.com
How to DO IT
Add the quinoa to a pot along with 200ml of water. Bring to a boil and then reduce to a simmer. Let simmer for about 10-15 minutes until all water is absorbed completely.
In the meantime make the vegan mayo. Add the soy milk, oil, salt and vinegar into a tall container. Take an immersion/ hand blender and place it on the very bottom. Turn the speed onto low and pull it up in one go until you have reached the surface of the liquids. Keep blending until it begins to emulsify and become creamy. Add the mustard and continue to blend for about 1 minute until it if smooth and creamy. Place in the fridge.
Slice the mushrooms into about 0,5 cm thick slices.
In a small bowl combine the soy sauce, maple syrup, hot sauce and conrnstarch. Make sure there are no big lumps of cornstarch in the mixture.
When the quinoa is done transfer it to a food processor. But make sure it has really absorbed all liquids, otherwise the burger patty will fall apart. Add about 2/3 of the teriyaki mixture to it and blend well. It should all stick together and form a big ball.
Slightly flour your hands so they are dry. Divide the quinoa mixture into 2 and form them into patties. Do this by first rolling a ball in your hand and laying it on a flat surface. Then press it down with the palm of hand to make a flat surface.
Heat up half of the oil in a pan. Sautée the mushrooms in there for about 3 minutes. Reduce the heat and add the remaining teriyaki sauce.
Mash the avocado. Half the burger buns and toats the bottom half.
Heat up the remaining oil in another pan. Once hot add the quinoa patties and fry on each side for about 3-4 minutes.
Once the bottom bun is toasted add a generous spread of mayonaise. Top it with some salad. Add the black quinoa patty on top. Then theh mushrooms and some sliced cucumber if using. Lastly, add the mashed avocado and the top half of the burger bun. Serve and enjoy!
COCONUT CURRY LENTILS
Comforting, warm, delicious, nutritious. The perfect winter dish and one of the best ways to cook lentils!

unepetitecuisiniere.com
A LITTLE BIT ABOUT LENTILS
Lentils are a real amazing food as they are packed with protein and nutrients. They are part of the legume family, along with beans and chickpeas and they contain 25g of protein per 100g, which is the same amount as a chicken breast contains! They are really easy to cook and if you are too lazy to cook them, you can also find some canned ones at the supermarkets too!
AND THE OTHER INGREDIENTS
The onion and the spices in the beginning, just give the entire dish this kick of flavour. The onion adds the sweetness while the spices heat it up and give the oriental touch. We use dry spices and not curry paste because we believe that they work better with the lentils.
The coconut milk creams up the entire dish and adds richness. This recipe is a mix of the Thai and Indian cuisine, because Indians do not use coconut milk but they use a lot of dry spices, whereas Thais use both coconut milk and curry paste. So it is a great crossover!

unepetitecuisiniere.com
What you will need
1 tablespoon of Olive Oil
1 White Onion
1 teaspoon of Turmeric Powder
1 teaspoon of Paprika Powder
1 teaspoon of Cinnamon
1 teaspoon of Curry Powder
120g of Red Lentils
300ml of Vegetable Broth
150ml of Coconut Milk
2 teaspoons of Tomato Paste
2 teaspoons of Harissa Paste
1 teaspoon of Peanut Butter
Some leaves of Spinach or Kale to stir in (optional)
Some Cilantro and Peanuts to garnish
How to DO IT
Finely dice up the onion. In a pot heat up the olive oil and add the onion in. Sauté it for a few minutes until it is all glassy. Then add in the spices and let them in cooperate well for about one minute. Next, pour the lentils into the pot and sauté them for a few seconds before you add the vegetable broth.
Once it boils, reduce it to a medium-low heat and let them simmer for 15 minutes. They should almost be done by now. Add in the tomato and harissa paste, the peanut butter and the coconut milk. Stir everything in until well combined and creamy. Add in some spinach or kale if you like the tase of them.
Place your lentils in your bowls and garnish them with some peanuts and a little extra coconut milk. Serve over rice, vegetables or with bread and enjoy!
15 minute Beetroot Hummus
The best creamy & delicious beetroot hummus ever. Better than any pre-made takeout version!

unepetitecuisiniere.com
WHAT IS HUMMUS?
Hummus is a dip or a spread that originated and nowadays is found in the Middle Eastern cuisine. It has a very smooth consistency and is made out out chickpeas, tahini (which is a sesame paste), olive oil, garlic, and spices. It typically is enjoyed with some fresh Pita bread. Hummus is very popular among the vegan nutrition because it works great as a spread on bread or as a dairy free dip and is pretty healthy!
WHAT IS SPECIAL ABOUT THIS DISH?
Regular hummus, is made out of chickpeas as its main ingredient. But this one is a little different as besides the chickpeas, the star of the show is the beetroot. Beetroot is quite a popular ingredient to be added to hummus because its slightly sweet flavour works in perfect harmony with the creaminess and tanginess of the hummus. So instead of plain hummus, we are switching things up a little bit and making a delicious beetroot hummus!
THE SECRETS TO MAKING A REALLY GOOD HUMMUS
There are a few things you can look out for when making hummus to take it next level. First, use canned chickpeas or ones that are boiled really softly. Second, use a good Tahini. This is a sesame paste you can find at most supermarkets and has a creamy consistency. Alternatively, you can make your homemade Tahini paste using good quality sesame seeds and mixing them in a blender with seed oil.
Our third tip is to preserve some Aquafaba (this is the liquid the chickpeas come in when canned). Adding this will keep the hummus really creamy. Last tip we recommend is to use a splash of vinegar. As weird as it may sound, it really makes a difference! It adds this tanginess that makes a hummus really good. Sometimes lemons are used, but we really recommend trying some vinegar!

unepetitecuisiniere.com
What you will need
1 can of Chickpeas
2 small Beetroots (precooked)
1 tablespoon of Tahini
2 tablespoons of Olive Oil
2 teaspoon Vinegar (white wine vinegar works best)
3-4 tablespoons of Aquafaba (the liquid canned chickpeas come in)
1/2 teaspoon of Garlic Powder
1/2 teaspoon of Salt
1/2 teaspoon of Paprika Powder
How to DO IT
Drain the chickpeas but preserve the liquid in which they were in.
Add them to a blender along with all the other ingredients and add 3-4 tablespoons of that preserved liquid. Blend everything until smooth!
If it is too firm, add more olive oil or aquafaba. But be aware that beetroot hummus will not be as creamy as normal hummus because of the beets in it! Enjoy!
HEALTHY AND CRISPY CAULIFLOWER TACOS WITH SPICY MANGO SALSA
Taco dreams coming true with these crunchy baked cauliflowers topped up with a creamy avocado and spicy mango salsa.

unepetitecuisiniere.com
WHAT IS SPECIAL ABOUT THIS DISH?
This cauliflower is tossed in a super delicious, very non traditional marinade made out of Ajvar, samba olek, olive oil, maple, tomato paste, garlic cloves and sesame oil, then tossed in breadcrumbs and baked until crispy. This adds so much flavour to the cauliflower and will make it taste amazing! This recipe will really convince all meat eaters and non-cauliflower fans of this vegan version of tacos.Besides the star of the show we also have a creamy avocado-yoghurt sauce on top and some spicy mango salsa. More flavour, more color, more explosion in your mouth. The combination of all of these work in perfect harmony and make the ideal taco party!
ARE THESE HEALTHY?
Yes! Contrary to the meat in traditional tacos, cauliflower is low in calories, high in nutrients and low in fat. The marinade is also pretty healthy since it mainly consists of roasted red peppers. To make the cauliflower crispy, we are also not frying it but baking it in the oven, which is a game changer in terms of nutrients. Other than the cauliflower we also have an avocado yoghurt dip, which gives us the healthy fats we need (and the avocado that we need in tacos). The mango salsa, is another vitamin bomb which helps to keep your immune system strong!

unepetitecuisiniere.com
What you will need
For the cauliflower:
1 head of Cauliflower
6 tablespoons of Ajvar
2 teaspoons of Sambal Olek
3-4 Garlic Cloves
2 tablespoons of Tomato Paste
1 tablespoon Olive Oil
2 tablespoons of Maple Syrup
2 teaspoons of Sesame Oil
Salt and Pepper
50g Breadcrumbs
Olive Oil
The rest
1 Avocado
200g plant-based yogurt
1 Mango
2 deseeded Chilis
4 Spring Onions
1 Lime
2 tablespoons of Soy Sauce
1 teaspoon Maple Syrup
12 Taco Shells
Optional
Shredded Red Cabbage
Shredded Carrot
A splash of Vinegar
How to do it
Break or cut the cauliflower into small florets. Blend all the ingredients except the cauliflower, the breadcrumbs and the olive oil in a blender. Add the cauliflower to a large bowl and toss in the marinade. Let sit for at least 1 hour. The longer the better.
Heat up the oven to 180°C. Take the cauliflower out of the marinade and toss them in the breadcrumbs. Line a baking tray with parchment paper and add the cauliflower on top. Drizzle with oil and make sure that every piece has some oil on it. Bake for 15-20 minutes, then turn up to 200°C and bake for 5 minutes until crispy and golden brown.
In the meantime, mash the avocado and mix with the plant-based yogurt! Peel the mango and chop it into small cubes. Add to a bowl along with the deseeded and finely sliced chili, the spring onions and the cilantro. Combine the soy sauce, the lime juice and the maple syrup and mix it with the rest.
Optional: Toss the cabbage and carrots with a splash of vinegar and about 2-3 tablespoons of the avocado cream.
Heat up the taco shells.
Fill each taco shell with some cabbage (if making some), a few cauliflower florets, the salsa and avocado cream! Serve and enjoy!